Adding Let's Encrypt SSL Certificate to vCloud Director Keystore
For the longest time the configuring of vCloud Director’s SSL certificate keystore has been the thing that makes vCD admins shudder. There are lots of posts on the process…some good…some not so good. I even have a post from way back in 2012 about (https://anthonyspiteri.net/vcloud-director-and-citrix-netscaler-how-to/) and if I am honest, I cheated in having HTTPS at the load balancer deal with the SSL certificate while leaving vCD configured with the self signed cert. With the changes to the way the HTML5 Tenant Portal deals with certs and DNS I’m not sure that method would even work today. I wanted to try and update the self signed certs in both my lab environments to assist in resolving the No Datacenters are available issue that cropped up in vCD 9.1. Instead of generating and using self signed certs I decided to try use Let’s Encrypt signed certs. Most of the process below is curtesy of blog posts from Luca Dell’Oca and it’s worth looking at (https://fojta.wordpress.com/2016/07/16/automate-lets-encrypt-certificate-for-nsx-edge-load-balancer/) blog post from Tom Fojta who has a PowerShell script to automate Let’s Encrypt SSL certs for us on NSX Edge load balancers. In my case, I wanted to install the cert directly into the vCD Cell Keystore. The manual end to end the process is listed below. I intend to try and automate this process so as to overcome the one constraint with using Let’s Encrypt…that is the 90 day lifespan of the certs. I think that is acceptable and it ensures validity of the SSL cert and a fair caveat given the main use case for this is in lab environments.
Generating the Signed SSL Cert from Let’s Encrypt:
To complete this process you need the ACMESharp PowerShell module. There are a couple of steps to follow which include registering the domain you want to create the SSL cert against, triggering a verification challenge that can be done by creating a domain TXT record as shown in the output of the challenge command. Once submitted, you need to look out for a Valid Status response.
PS C:\ProgramData\ACMESharp\sysVault> New-ACMEIdentifier -Dns vcloud.aperaturelabs.biz -Alias aplabs2

IdentifierPart : ACMESharp.Messages.IdentifierPart
IdentifierType : dns
Identifier : vcloud.aperaturelabs.biz
Uri : https://acme-v01.api.letsencrypt.org/acme/authz/********xH92Xzm8ggC5ctaIrmEgQKyAjXeb6tFgVT8
Status : pending
Expires : 7/4/2018 1:38:28 PM
Challenges : {, }
Combinations : {1, 0}

PS C:\ProgramData\ACMESharp\sysVault> Complete-ACMEChallenge aplabs2 -ChallengeType dns-01 -Handler manual

IdentifierPart : ACMESharp.Messages.IdentifierPart
IdentifierType : dns
Identifier : vcloud.aperaturelabs.biz
Uri : https://acme-v01.api.letsencrypt.org/acme/authz/********H92Xzm8ggC5ctaIrmEgQKyAjXeb6tFgVT8
Status : pending
Expires : 7/4/2018 1:38:28 PM
Challenges : {, manual}
Combinations : {1, 0}

PS C:\ProgramData\ACMESharp\sysVault> (Get-ACMEIdentifier aplabs2).Challenges

ChallengePart : ACMESharp.Messages.ChallengePart
Challenge :
Type : http-01
Uri : https://acme-v01.api.letsencrypt.org/acme/challenge/********xH92Xzm8ggC5ctaIrmEgQKyAjXeb6tFgVT8/5331328098
Token :********g5cYoQcUaUhHiAA2qIMAvq_CTpMV-X5AE
Status : pending
OldChallengeAnswer : [, ]
ChallengeAnswerMessage :
HandlerName :
HandlerHandleDate :
HandlerHandleMessage :
HandlerCleanUpDate :
HandlerCleanUpMessage :
SubmitDate :
SubmitResponse :
ChallengePart : ACMESharp.Messages.ChallengePart
Challenge : ACMESharp.ACME.DnsChallenge
Type : dns-01
Uri : https://acme-v01.api.letsencrypt.org/acme/challenge/********xH92Xzm8ggC5ctaIrmEgQKyAjXeb6tFgVT8/5331328099
Token :********ko5kw1tjZ6NIlOrkY0KNDCx6zp0FUD4WM
Status : pending
OldChallengeAnswer : [, ]
ChallengeAnswerMessage :
HandlerName : manual
HandlerHandleDate : 6/27/2018 9:38:42 AM
HandlerHandleMessage : == Manual Challenge Handler - DNS ==
 * Handle Time: [6/27/2018 9:38:42 AM]
 * Challenge Token: [********_Zko5kw1tjZ6NIlOrkY0KNDCx6zp0FUD4WM]

 To complete this Challenge please create a new Resource
 Record (RR) with the following characteristics:
 * RR Type: [TXT]
 * RR Name:
 * RR Value: [********uK6sTtuXdYOZ87IZr1KF0Z_3NTtgfg8AH8]
 ------------------------------------
HandlerCleanUpDate :
HandlerCleanUpMessage :
SubmitDate :
SubmitResponse :

PS C:\ProgramData\ACMESharp\sysVault> Submit-ACMEChallenge aplabs2 -ChallengeType dns-01

IdentifierPart : ACMESharp.Messages.IdentifierPart
IdentifierType : dns
Identifier : vcloud.aperaturelabs.biz
Uri : https://acme-v01.api.letsencrypt.org/acme/authz/********xH92Xzm8ggC5ctaIrmEgQKyAjXeb6tFgVT8
Status : pending
Expires : 7/4/2018 1:38:28 PM
Challenges : {, manual}
Combinations : {1, 0}

PS C:\ProgramData\ACMESharp\sysVault> (Update-ACMEIdentifier aplabs2 -ChallengeType dns-01).Challenges | Where-Object {$_.Type -eq "dns-01"}

ChallengePart : ACMESharp.Messages.ChallengePart
Challenge : ACMESharp.ACME.DnsChallenge
Type : dns-01
Uri : https://acme-v01.api.letsencrypt.org/acme/challenge/********xH92Xzm8ggC5ctaIrmEgQKyAjXeb6tFgVT8/5331328099
Token :********_Zko5kw1tjZ6NIlOrkY0KNDCx6zp0FUD4WM
Status : valid
OldChallengeAnswer : [, ]
ChallengeAnswerMessage :
HandlerName : manual
HandlerHandleDate : 6/27/2018 9:38:42 AM
HandlerHandleMessage : == Manual Challenge Handler - DNS ==
 * Handle Time: [6/27/2018 9:38:42 AM]
 * Challenge Token: [********_Zko5kw1tjZ6NIlOrkY0KNDCx6zp0FUD4WM]

 To complete this Challenge please create a new Resource
 Record (RR) with the following characteristics:
 * RR Type: [TXT]
 * RR Name:
 * RR Value: [********uK6sTtuXdYOZ87IZr1KF0Z_3NTtgfg8AH8]
 ------------------------------------
HandlerCleanUpDate :
HandlerCleanUpMessage :
SubmitDate : 6/27/2018 9:53:22 AM
SubmitResponse : {StatusCode, Headers, Links, RawContent...}
Once complete, there is a script that can be run as show on Luca’s Blog. I’ve added to the script to automatically import the newly created SSL cert into the Local Computer certificate store.
PS C:\ProgramData\ACMESharp\sysVault> C:\Users\anthonyspiteri\Documents\PowerCLI\ssl_gen_le.ps1

Press Enter to continue...:
Id : 10c6b280-88fa-49d0-bead-9f98046aca74
Alias : aplabs2-2018-06-27-09-56
Label :
Memo :
IdentifierRef : 78828140-16c2-40e5-9932-c37b065cf291
IdentifierDns : vcloud.aperaturelabs.biz
AlternativeIdentifierDns :
KeyPemFile : ********-88fa-49d0-bead-9f98046aca74-key.pem
CsrPemFile : ********-88fa-49d0-bead-9f98046aca74-csr.pem
GenerateDetailsFile : ********-88fa-49d0-bead-9f98046aca74-gen.json
CertificateRequest : ACMESharp.CertificateRequest
CrtPemFile : ********-88fa-49d0-bead-9f98046aca74-crt.pem
CrtDerFile : ********-88fa-49d0-bead-9f98046aca74-crt.der
IssuerSerialNumber : ********0000015385736A0B85ECA708
SerialNumber : ********4DE77F1E372768C5B307DC3B1B87
Thumbprint : ********799A2E754C08EE3569B667F470AF61E71
Signature : ********99A2E754C08EE3569B667F470AF61E71
SignatureAlgorithm : sha256RSA
RevokedAt :

PSPath : Microsoft.PowerShell.Security\Certificate::LocalMachine\my\9D9B264799A2E754C08EE3569B667F470AF61E71
PSParentPath : Microsoft.PowerShell.Security\Certificate::LocalMachine\my
PSChildName : 9D9B264799A2E754C08EE3569B667F470AF61E71
PSIsContainer : False
Archived : False
Extensions : {System.Security.Cryptography.Oid, System.Security.Cryptography.Oid, System.Security.Cryptography.Oid, System.Security.Cryptography.Oid...}
FriendlyName : CN=vcloud.aperaturelabs.biz
IssuerName : System.Security.Cryptography.X509Certificates.X500DistinguishedName
NotAfter : 9/25/2018 8:56:55 AM
NotBefore : 6/27/2018 8:56:55 AM
HasPrivateKey : True
PrivateKey :
PublicKey : System.Security.Cryptography.X509Certificates.PublicKey
RawData : {48, 130, 6, 27...}
SerialNumber : ********77F1E372768C5B307DC3B1B87
SubjectName : System.Security.Cryptography.X509Certificates.X500DistinguishedName
SignatureAlgorithm : System.Security.Cryptography.Oid
Thumbprint : ********99A2E754C08EE3569B667F470AF61E71
Version : 3
Handle : 2048481365152
Issuer : CN=Let's Encrypt Authority X3, O=Let's Encrypt, C=US
Subject : CN=vcloud.aperaturelabs.biz
EnhancedKeyUsageList : {Server Authentication (1.3.6.1.5.5.7.3.1), Client Authentication (1.3.6.1.5.5.7.3.2)}
DnsNameList : {vcloud.aperaturelabs.biz}
SendAsTrustedIssuer : False
EnrollmentPolicyEndPoint : Microsoft.CertificateServices.Commands.EnrollmentEndPointProperty
EnrollmentServerEndPoint : Microsoft.CertificateServices.Commands.EnrollmentEndPointProperty
PolicyId :
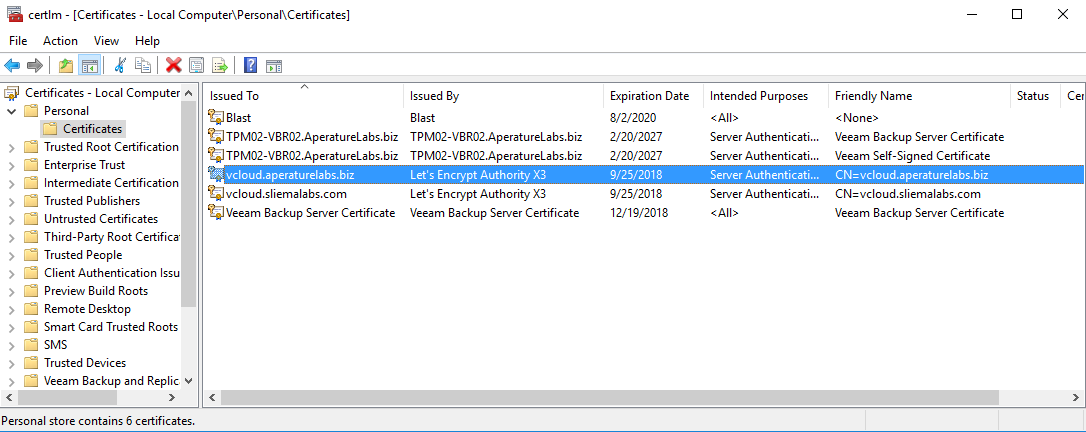
From here, I exported the certificate with the private key so that you are left with a PFX file. I also saved to Base-64 X.509 format the Root and Intermediate certs that form the whole chain. This is required to help resolve the No Datacenters are available error mentioned above. Upload the three files to the vCD cell and continue as shown below.
Importing Signed SSL from Let’s Encrypt into vCD Keystore:
Next, the steps to take on the vCD Cell can be the most complex steps to follow and this is where I have seen different posts do different things. Below shows the commands from start to finish that worked for me…see inline for comments on what each command is doing.
# Convert PFX to PEM
openssl pkcs12 -in vcloud.aperaturelabs.biz.pfx -out certificate.cer -nodes
# Get Private Key from file
vi certificate.cer
# Create new file with Private Key
vi certificate.key
# Recreate PFX and create Alias for http and consoleproxy
openssl pkcs12 -export -in certificate.cer -inkey certificate.key -name http -passout pass:password -out http.pfx
openssl pkcs12 -export -in certificate.cer -inkey certificate.key -name consoleproxy -passout pass:password -out consoleproxy.pfx
# Import the http and consoleproxy PFXs into the new KeyStore
/opt/vmware/vcloud-director/jre/bin/keytool -importkeystore -srckeystore http.pfx -srcstoretype PKCS12 -destkeystore CERTIFICATES.ks -deststoretype JCEKS -deststorepass password -srcalias http -destalias http -srcstorepass password
/opt/vmware/vcloud-director/jre/bin/keytool -importkeystore -srckeystore consoleproxy.pfx -srcstoretype PKCS12 -destkeystore CERTIFICATES.ks -deststoretype JCEKS -deststorepass password -srcalias consoleproxy -destalias consoleproxy -src storepass password
# Import the Intermediate and root files that form the chain
/opt/vmware/vcloud-director/jre/bin/keytool -importcert -alias intermediate -file le-int.cer -storetype JCEKS -keystore CERTIFICATES.ks -storepass password
/opt/vmware/vcloud-director/jre/bin/keytool -importcert -alias root -file le-root.cer -storetype JCEKS -keystore CERTIFICATES.ks -storepass password
# List the KeyStore certificates to ensure everything is there
/opt/vmware/vcloud-director/jre/bin/keytool -list -keystore CERTIFICATES.ks -storetype JCEKS -storepass password
# Save existing Keystore and overwrite with new
cp certificates.ks certificates.ks.old
cp ~root/CERTIFICATES.ks /opt/keystore/certificates.ks
# Assign ownership of the new KeyStore to vCloud user and group
chown vcloud:vcloud certificates.ks
# Run the vCD Configuration again to import the new KeyStore
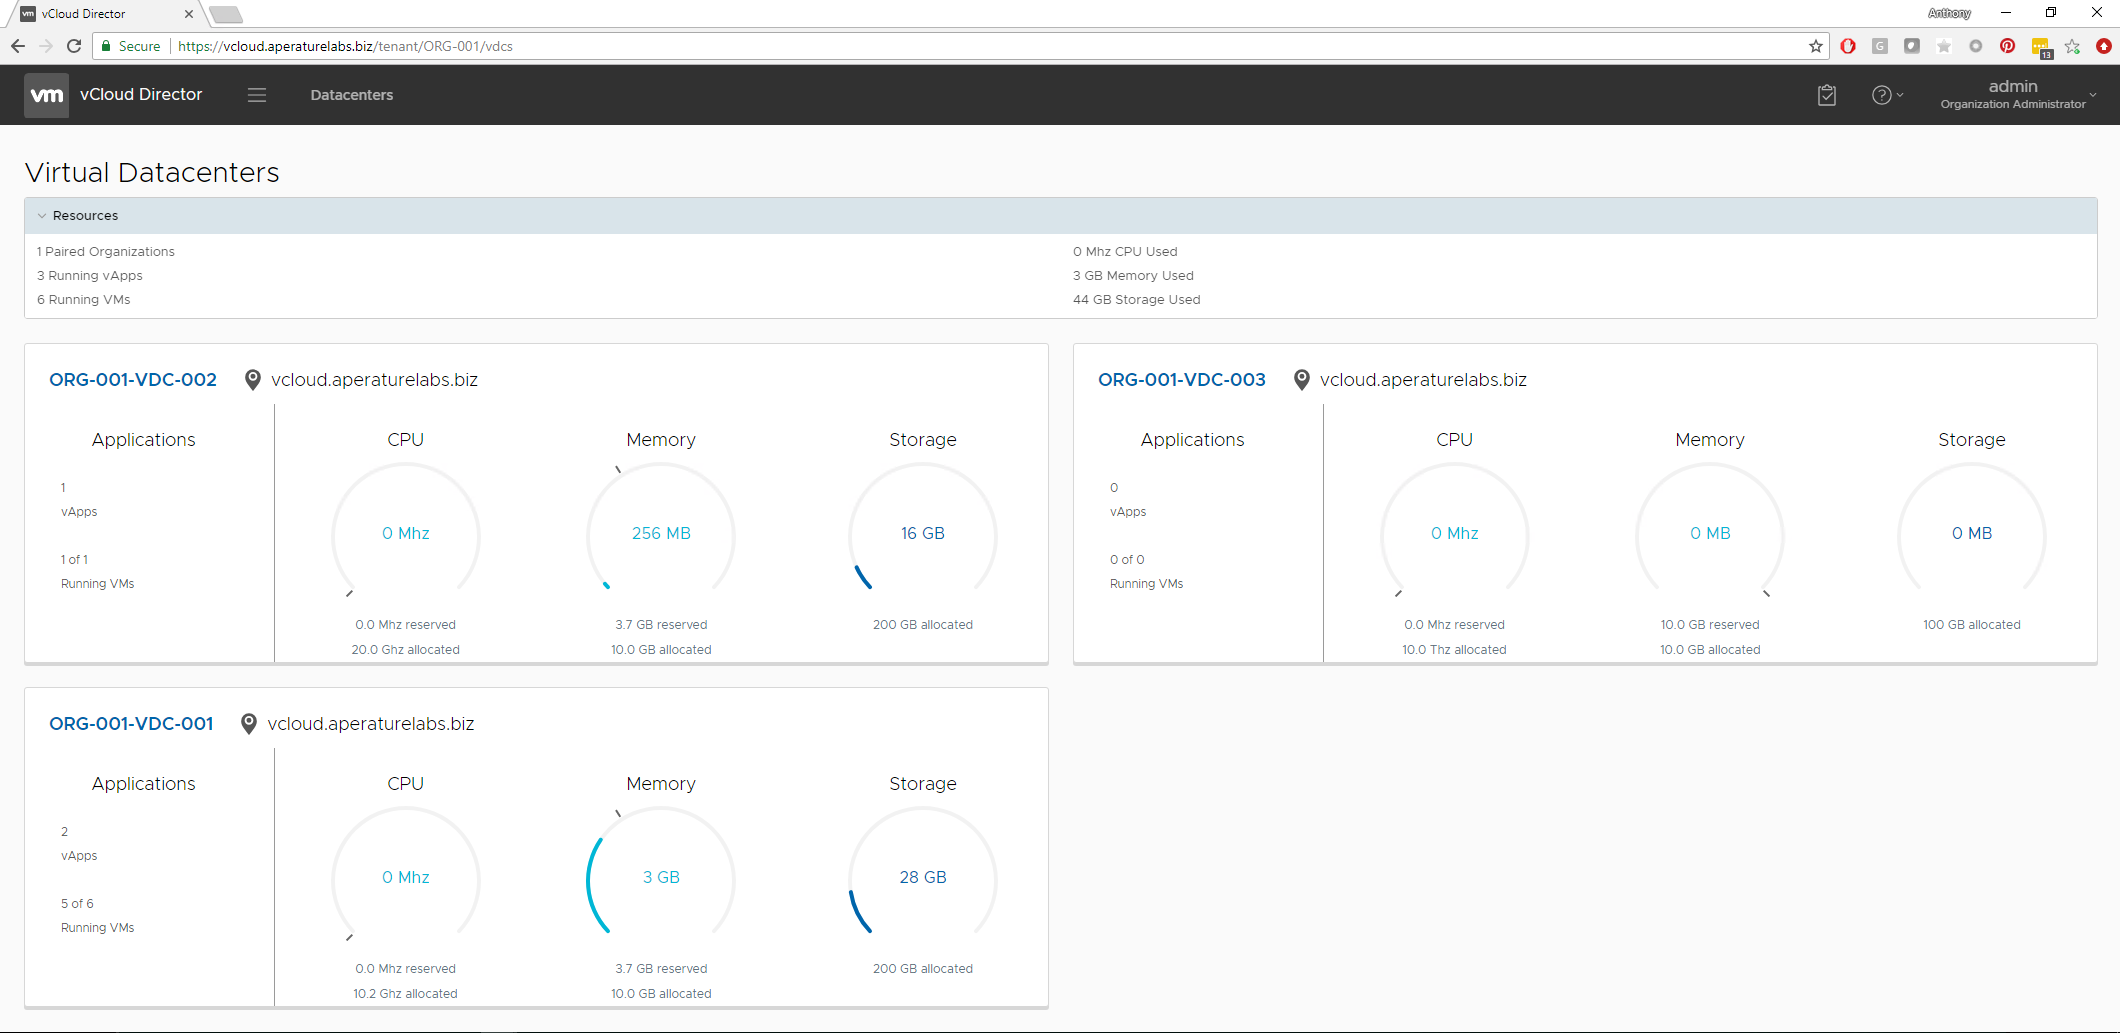
/opt/vmware/vcloud-director/bin/configureOnce that has been done and the vCD services has restarted, the SSL cert has been applied and we are all green and the Let’s Encrypt SSL cert is in play.
1 Commentarchived