I’ve should have written this article a long long time ago! In fact, i’ve been promising certain people that I would write this up for a number of years. The trigger to actually get this done was the fact I had recently cleaned up my previous NestedESXi infrastructure only leaving the bare essentials. The setup was a carry over from days at Zettagrid and I wanted to start fresh. I also ultimately wanted to go with a fresh NSX-T network layer instead of the existing NSX-v. I know a lot of people in the vCommunity are proud of their mega HomeLab setup and spend significant dollars on the compute, storage and networking gear… but I took the minimalist approach when I transitioned from having almost unlimited lab resources at Zettagrid, to when I first moved to Veeam and had essentially nothing.
I needed a solution that was sustainable and relatively simple to maintain without spending a lot of cash, while also keeping the actual hardware required down to a minimum. At the same time, I wanted to have the NestedESXi solution to still mimic real production platforms in that the networking should not be flat, and that there should be dedicated subnets for specific purposes. In this two part post, I’m going to lay out how I have configured my physical standalone host to handle all the networking and NestedESXi requirements without the need for external switching or routing.
For me… having it all self contained was essential. The diagram below represents a high level design of the what I have setup:

Physical Host
Those following my blog for a while know that I purchased a SuperMicro 5028D-TNT4 as soon as I started with Veeam back in late 2016. In terms of how that bit of kit is going today, it’s still purring and hasn’t missed a beat. Ultimately there is no need to upgrade the compute and memory from its initial purchase spec. Before I blew away the majority of my NestedESXi workloads I was able to push the servers resources pretty high in terms of memory consumption… which is obviously the most limiting factor when it comes to homelabs. But with 128GB of RAM I was able to run a number of top level, and nested workloads to facilitate my needs. In terms of Hard Drives, i’ve found the two SSDs and the one large HDD to be sufficient. Though I do have a decent offsite backup policy going just in case.
My setup is about reducing complexity and costs while accepting certain risks around availability.
Physical Host Networking
This is actually where all the magic happens. How do you mimic a multi-layered network on a single host while being able to leverage network segmentation within the NestedESXi environment without using external switching or routing? The answer is actually something that anyone who has done their VCAP would know about, but maybe has never thought to use outside of a Pearson Vue center… Private VLANS!

The Private VLAN setup contains all the VLANs for the NestedESXi Host networking to carry traffic which is connected to the outside world via a Virtual Router (VYOS) that is configured with a number of interfaces that plug into the top level PortGroups and also has an Uplink that is placed on the external network. Most important is the Trunk PortGoup which provides access to all VLANs and is connected to the Router and the NestedESXi hosts.

I created one interface per Nested Subnet which in turn means that the Edge Router (VYOS) needs to have each PortGroup connected as a seperate interface. (note that you could trunk them all through a single PortGroup)

From here, the Edge has the interfaces configured and will provide routing and firewalling between the subnets to, from and within the whole environment. Gateways are set here as shown below.

MacLearning and Promiscuous Mode
In the old days, you needed to configure Promiscuous Mode on the Virtual Switches and PortGroups in able to have the NestedESXi traffic flowing. Over the years, i’ve written a number of posts around the subject with William Lam writing various posts in regards to why it was needed at the time. Now days we have the MacLearn Filter that was first released as a VMware Fling is built into ESXi from 6.7. This means that you don’t need to mess with Promiscuous mode on the PortGroups any more. The easiest way to configure this is via the MacLearn PowerShell Module.
Below, you can see an example of how I configured the PortGroups on the physical ESXi host. First, as it was before applying the changes.

Then after setting the MacLearn options.

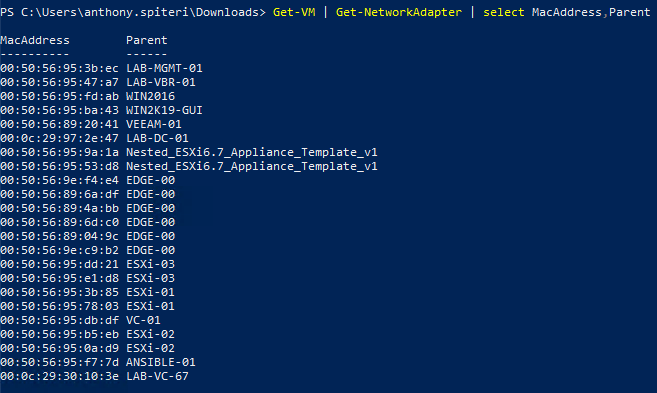
Once that’s done, from the physical ESXi host you should be seeing something similar to below in regards to the MacLearning doing its thing.

You can see that we have multiple MAC addresses registered and if I look at the corresponding addresses of the Nested Hosts and other VMs..
Part One Wrap Up
Using Private VLANS, i’ve shown how to configure the physical layer within a single ESXi Host to support a multi-layered NestedESXi environment. In Part 2, i’ll dig into the Nested layer to show what that looks like. In future posts, I am going to look to show you how the NSX-T deployment, setup and configuration has gone as well as look at how Veeam can help protect lab workloads for peace of mind when working in a single host situation.


