
Eero Mesh WiFi Review Part 2 – Setup and Performance Comparison
A few months ago I wrote about why I decided to go with the Eero extenders for WiFi at home and went over some of the technical specs of the Eero mesh router pack. In this post I am going to go through a little bit about the setup and then dive straight into some comparisons with my previous WiFi Router which will show you how much of an improvement I got from my existing WiFi enabled Router. In my opinion with this Eero WiFi Mesh review, I am confident of recommending this as one of the best mesh WiFi systems out there.
Update: For those with WiFi 6 enabled devices… Eero now has WiFi 6 enabled models. Amazon has debuted the Eero 6 and the Eero Pro 6 mesh WiFi routers, along with the Eero 6 extender, that support WiFi 6 and have a built-in Zigbee hub which is desirable for smart home tech connectivity. The Eero Pro 6 improves on its predecessor… would have been interesting to compare the in house differences between the Eero standard, Pro and now the WiFi 6 versions… but bang for buck the Eero Mesh now comes in at even better value!
Quick Look at Setup:
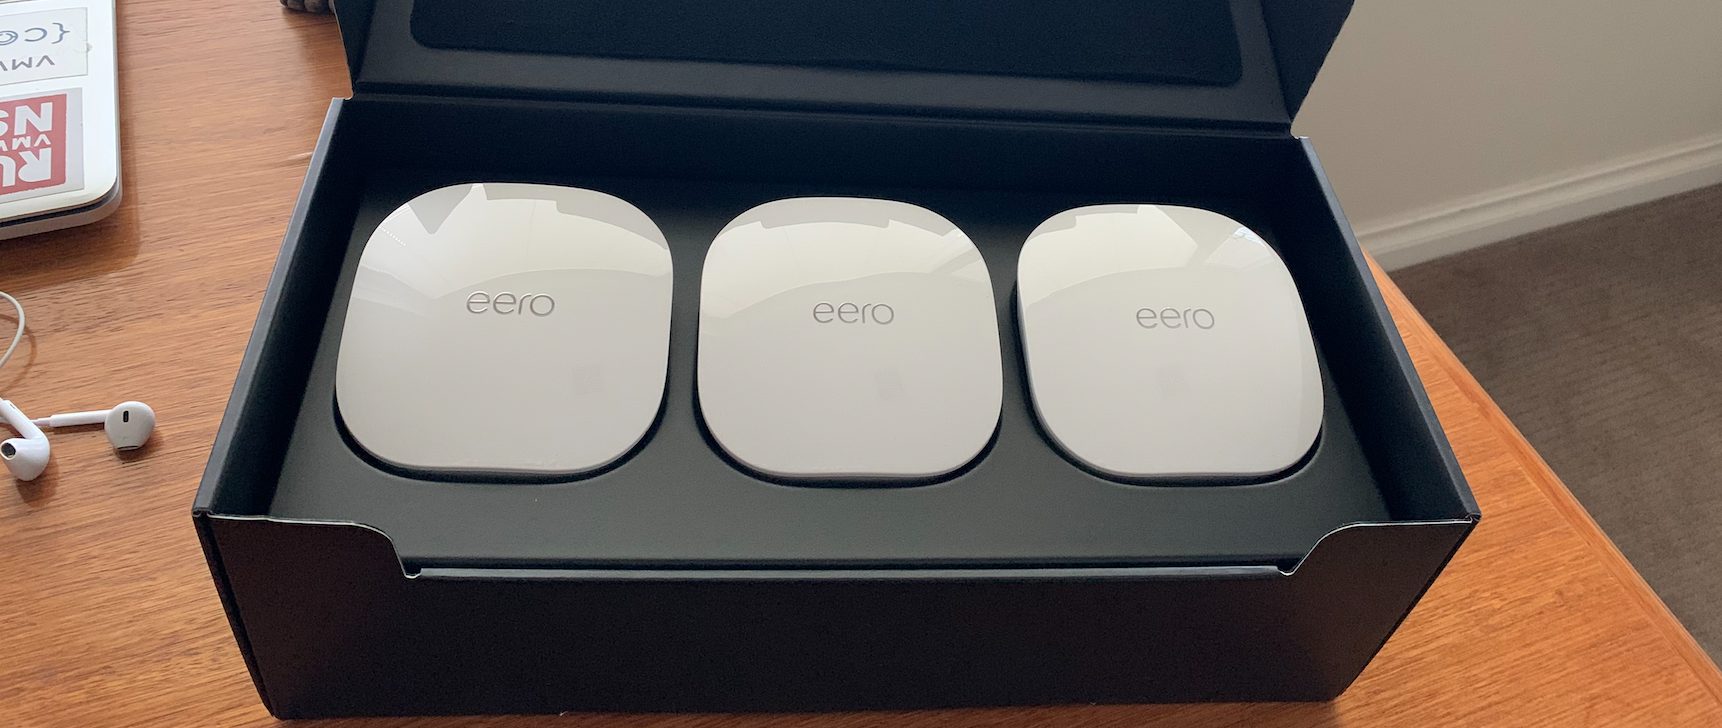
Firstly, sometime must be said about the packaging of the Eero three pack… as shown below the presentation is top notch and I am a big believer that there is something to be said about high quality packaging and presentation in tech products. Apple has led the way in that field, but also if I think about how my Sonos was packaged, it is fair to say that quality brings quality and first impressions last.
 From here, there is a simple one page instruction sheet that effectively tells you to disable your WiFi on your existing router, plug in one of the Eero units and connect it to the internet router via the provided ethernet cable. In my case, I already had an established subnet for all my existing devices which was configured with DHCP on the original router. There is only a mobile app for Eero… in fact one of the bigger criticisms that I have read (and tend to agree with) is that there is no website configuration portal. This would be a welcome addition… not that the mobile app isn’t easy to use and functional, I always feel like there should be a web interface for these sorts of devices.
I disabled WiFi and DHCP, and turned on the Eero. From there the app did the rest. I didn’t get to choose the new network IP range, but from what I have read, the setup looks at the existing gateway range and works on making sure they do not overlap and that traffic can route between them.
At the end of the setup, the first Eero you setup becomes the gateway and subsequent devices mesh together through that.
From here, there is a simple one page instruction sheet that effectively tells you to disable your WiFi on your existing router, plug in one of the Eero units and connect it to the internet router via the provided ethernet cable. In my case, I already had an established subnet for all my existing devices which was configured with DHCP on the original router. There is only a mobile app for Eero… in fact one of the bigger criticisms that I have read (and tend to agree with) is that there is no website configuration portal. This would be a welcome addition… not that the mobile app isn’t easy to use and functional, I always feel like there should be a web interface for these sorts of devices.
I disabled WiFi and DHCP, and turned on the Eero. From there the app did the rest. I didn’t get to choose the new network IP range, but from what I have read, the setup looks at the existing gateway range and works on making sure they do not overlap and that traffic can route between them.
At the end of the setup, the first Eero you setup becomes the gateway and subsequent devices mesh together through that.
 As mentioned in the first post, the most central location in my house is in the upstairs kitchen area. This is where the Internet Router and Eero gateway live. It is also where I place my Phillips Hue Hub.
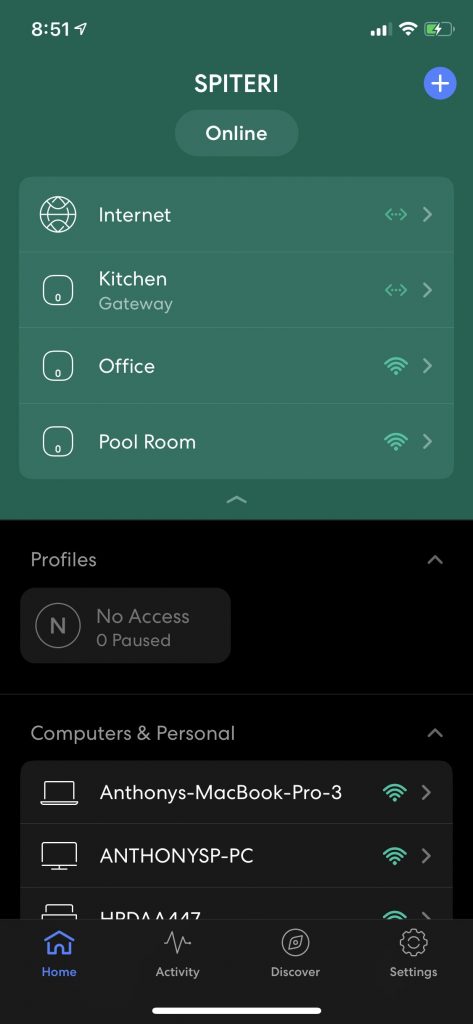
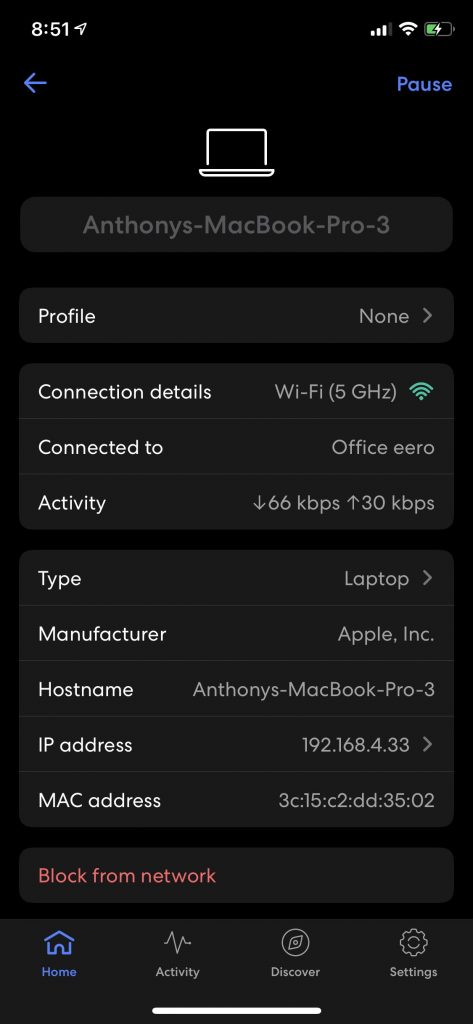
 Devices have enough details to be useful as well as controls to Pause/Block network access based on configurable policies.
Coverage and Performance:
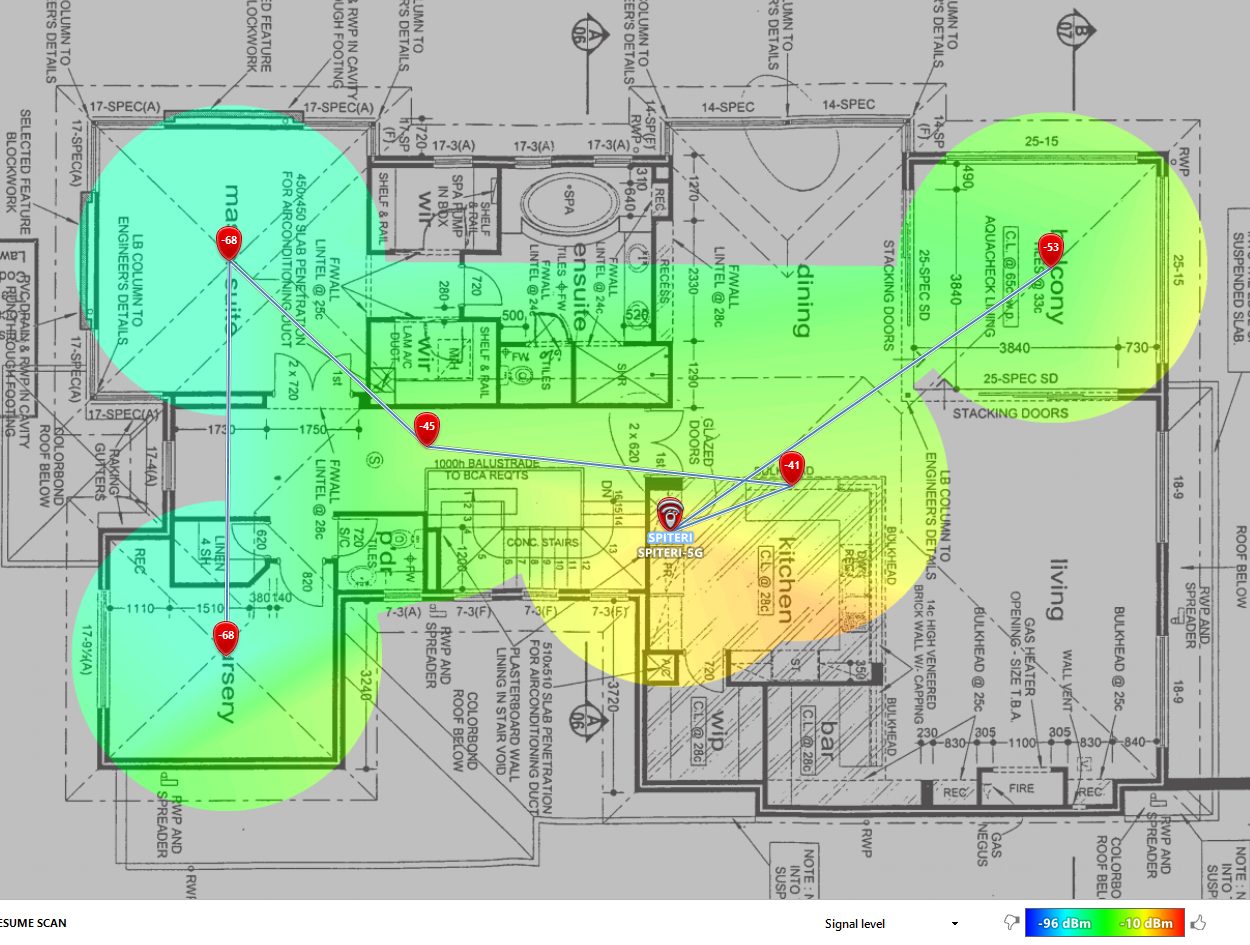
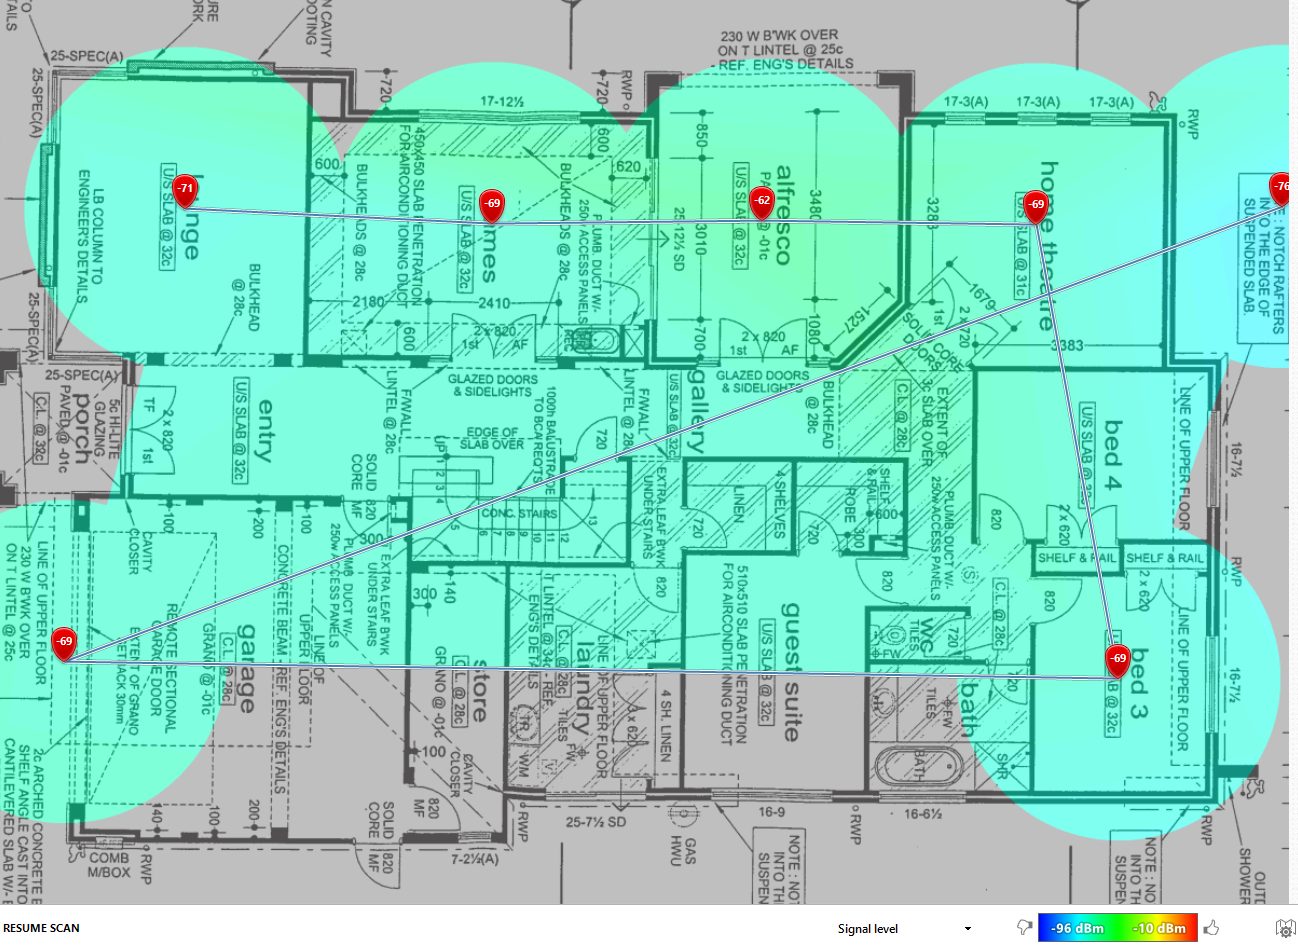
As mentioned in the (https://anthonyspiteri.net/eero-mesh-wifi-part-1-my-selection-criteria-and-tech-overview/), my biggest decision point for going down the mesh network route was to maximize coverage in a larger house. Before making the purchase I ran a WiFi Network Survey using NetSpot with my existing WiFi router. As you can see from the below with an underlay of my house plans for both lower and upper stories. the results where as expected with the point measurements in each room taken showing that the further away from the standard WiFi route the more signal loss I had. Upstairs, is show first and the hotter the colour the better the signal, but even upstairs, with the central location of the router, the WiFi Speed Test and WiFi Signal noise loss values were not great.
Previous Setup:
 Downstairs was even worse, with significant signal loss in critical areas of the house. The outside Patio area was at -76 dBm and, at the other end, the Garage Door Ring Cam area was only getting -69 dBm.
Eero Mesh Devices:
The difference is night and day with the mesh network in place. Upstairs, I have two Eero devices, and together they create a perfect signal for all main living areas and especially in my study where I was getting lots of signal loss on my MacBook Pro (see below).
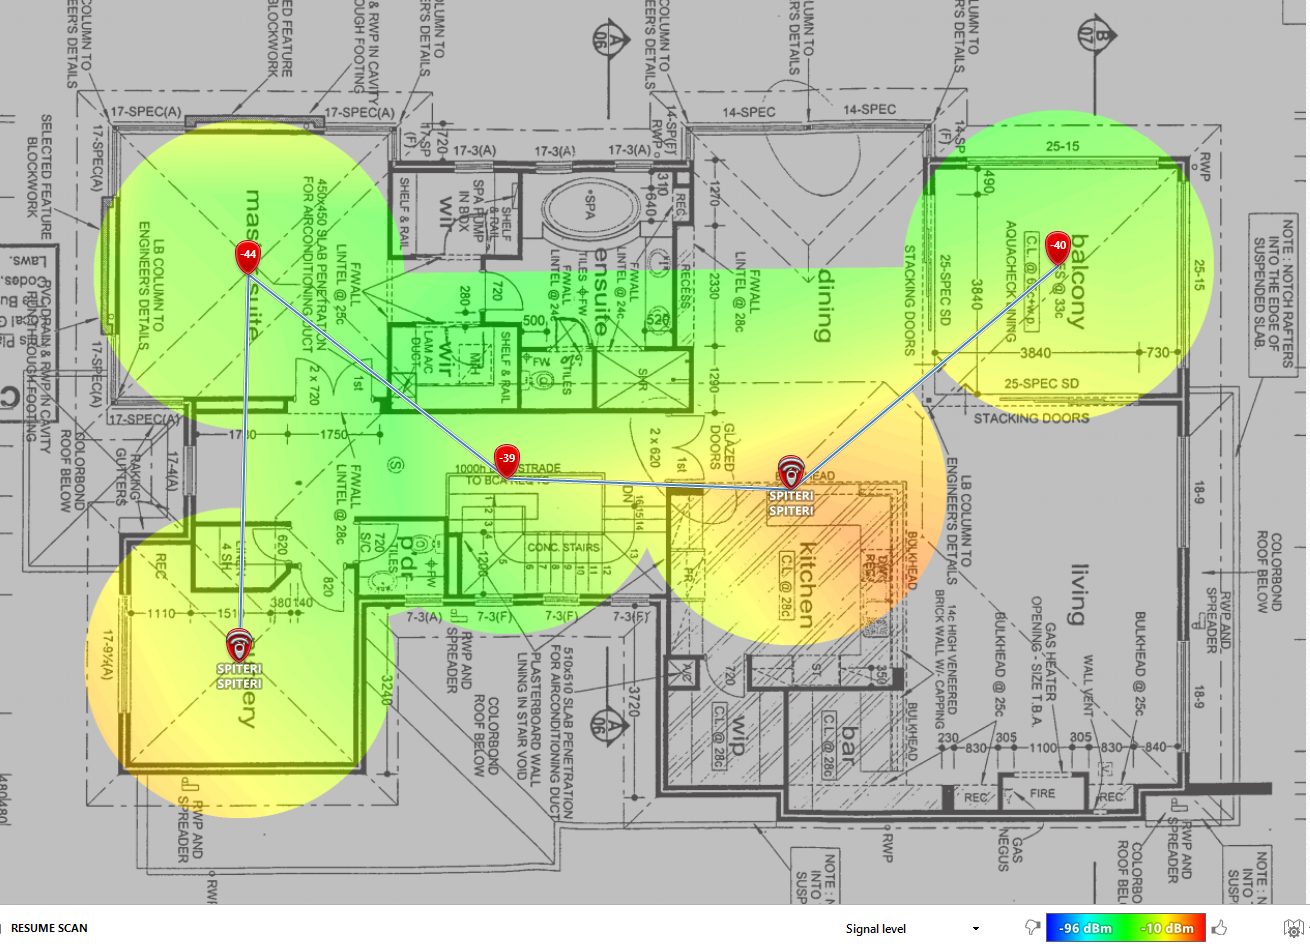 Downstairs, the signal to the Patio was made a lot more stable even though it would appear to be a slight gain in the dBm reading, but crucially all other areas now has solid and reliable coverage.
MacBook Pro:
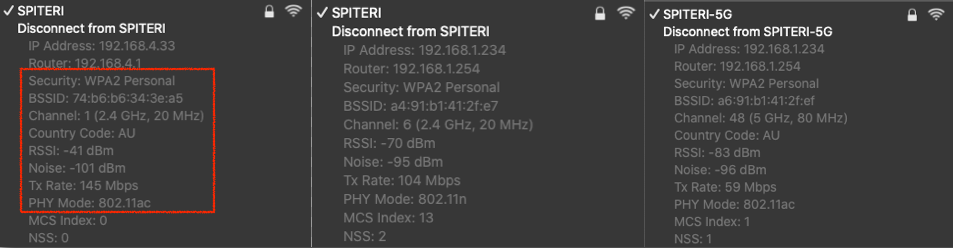
An interesting comparison to also look at is the impact the change had on the signal strength and stability of my MacBook Pro. As a refresher, there is no concept of dual bands being advertised by the Eero Mesh Network, so both 2.4GHz and 5GHz channels auto negotiate based on certain algorithms between with client and the Eero devices. As shown below, my MacBook Pro WiFi really struggled with the previous router setup and I would often get dropouts on the higher frequency WiFi due to distance… but in truth, both signal to noise loss rations where terrible. The left hand side represents the Eero at a very manageable and stable -41 dBm, while the right hand side shows you why I has so much issue keeping a steady connection in the office on the MacBook.
Conclusion:
Overall I can’t fault the Eero Mesh devices… and these are effectively now their lower end units with the Pros and the new WiFi 6 range having been announced. I’ve been recommending these to all my friends who are having WiFi issues… issues that they generally blame on their Internet Provider, however nine times out of ten, WiFi performance is almost exclusively governed by the quality of your network setup. Eero take the hard work out of getting that right and at a very affordable price point. They are are very much about the easy button as well… some harder core tech people will find them a little restrictive in terms of functions, but for those that just want quick, reliable WiFi that covers a large area… Eero Mesh can’t come more highly recommended from me!