Deploying Tanzu with HAProxy on a Single ESXi HomeLab Host Architecture
VMware released Update 1 of vSphere 7 last month and one of the big things to come out of that release was the ability to deploy Tanzu Basic which is vSphere with Tanzu, which was vSphere with Kubernetes, which was Project Pacific. I think the only way in which you will truly get an appreciation for the significance of this integration of VMware Kubernetes into vSphere is by actually trying it. I can tell you that until I got past the deployment and created my first namespace, I still didn’t truly get the power of this solution when it comes to VMware giving us the best of both the traditional VM virtualization… and the containerized micro services world. One of the big things holding back home labbers was the requirement for NSX-T and VMware Cloud Foundation. I borrowed heavily from Cormac’s blog (https://cormachogan.com/2020/09/28/enabling-vsphere-with-tanzu-using-ha-proxy/), and he does a great job explaining the new solution delivered in Update 1 of vSphere 7.0 and how it differs. The biggest negative in going down the HAProxy over NSX-T path is that you can’t deploy PodVMs. These are pods that will be hosted in lightweight VMs that run directly on ESXi. This has benefits on several fronts: efficiency, security and performance. In our testing, we found that, due to better scheduling CPU bound containers are projected to run 30% faster on PodVMs than on traditional vSphere VMs; containers on PodVMs have the potential to be 8% faster than containers on bare metal!
With the release of vSphere 7.0U1, vSphere with Kubernetes has been decoupled from VMware Cloud Foundation (VCF). VMware now has two vSphere with Kubernetes offerings, the original VCF based vSphere with Kubernetes offering, now referred to as VCF with Tanzu, and a newer offering outside of VCF, referred to as vSphere with Tanzu
Regardless of the caveats, Update 1 now gives more people in their labs the ability to deploy and get familiar with with vSphere with Tanzu is all about. Note that literally as I finished my deployment, William Lam released his much anticipated Auto Deploy Script that builds on the awesome work previously and now sets up a fully NestedESXi environment ready for the final deployment and config steps of Tanzu. He also posted yesterday an automated PowerShell script to configure the Workload Management. This deployment doesn’t use the Auto Deploy Script.
Lab Setup and Networking:
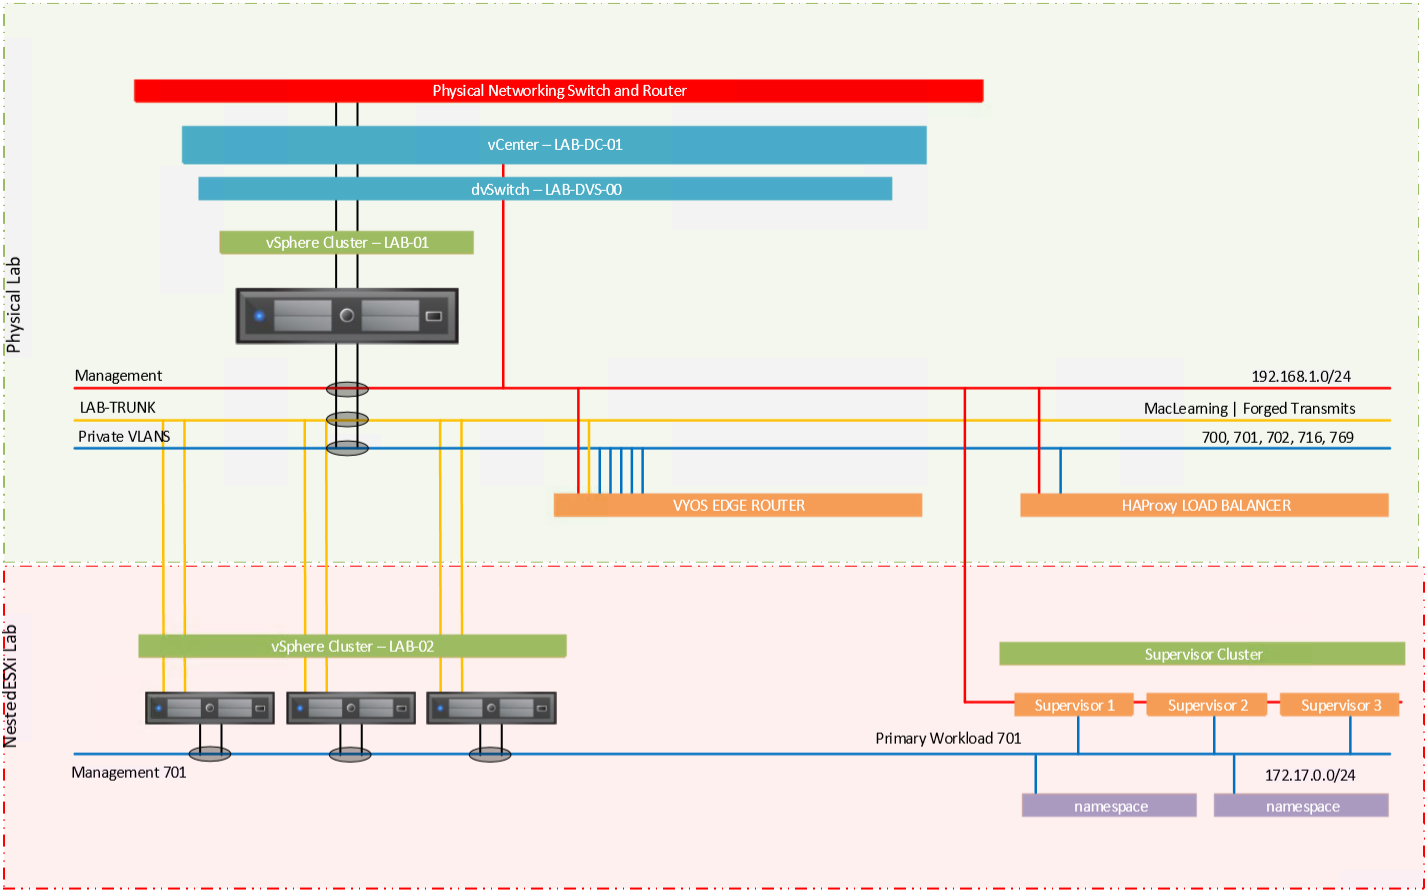 The above is how I set it up on my homelab system which used a combination of top level vCenter, with NestedESXi hosts running on a single server without any external networking requirements. The key here to save resources and have some host flexibility is to leverage the top level vCenter…not a seperate one for the NestedESXi hosts.
As mentioned in my previous posts on my NestedESXi lab setup, I have a Vyos router handling all the networking and this is how I leveraged the networking requirements for the deployment. Due to my single host setup, there is a bit of a hybrid approach to the networking but in a nutshell I am sharing a Private VLAN subnet for the Primary Workload network (172.17.0.0/24) and also used that for the Load Balancer Virtual IPs. The Supervisor control plane is connected to a physical subnet (192.168.1.0/24) which is where my physical vCenter and ESXi host lives. The HAProxy and Supervisors are both dual homed to those networks.
The above is how I set it up on my homelab system which used a combination of top level vCenter, with NestedESXi hosts running on a single server without any external networking requirements. The key here to save resources and have some host flexibility is to leverage the top level vCenter…not a seperate one for the NestedESXi hosts.
As mentioned in my previous posts on my NestedESXi lab setup, I have a Vyos router handling all the networking and this is how I leveraged the networking requirements for the deployment. Due to my single host setup, there is a bit of a hybrid approach to the networking but in a nutshell I am sharing a Private VLAN subnet for the Primary Workload network (172.17.0.0/24) and also used that for the Load Balancer Virtual IPs. The Supervisor control plane is connected to a physical subnet (192.168.1.0/24) which is where my physical vCenter and ESXi host lives. The HAProxy and Supervisors are both dual homed to those networks.
vSphere Prerequisites:
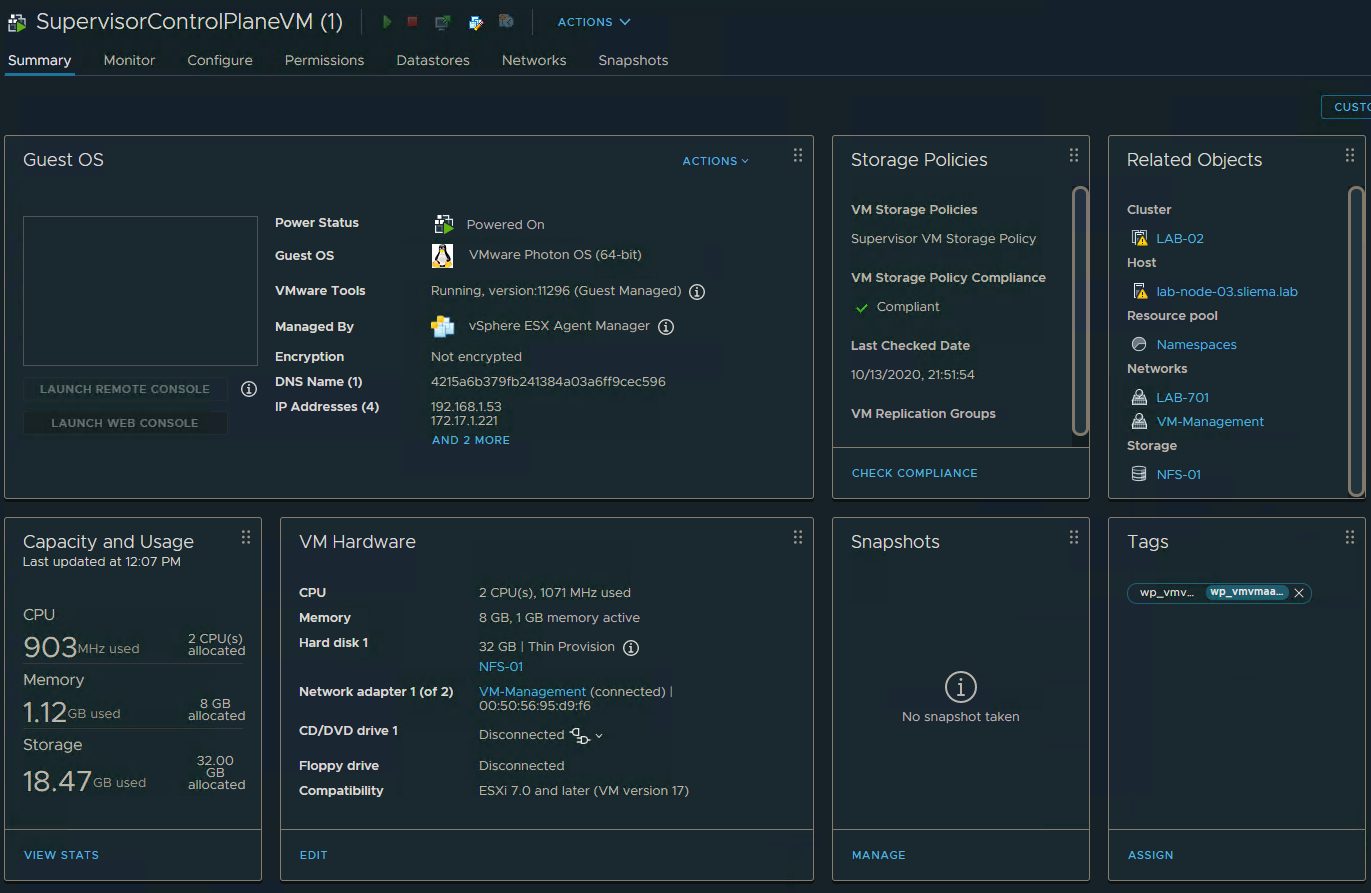
The list of prerequisites for leveraging a traditional VMware Distributed Port without the need for NSX-T is pretty simple. You need to enable DRS and HA and have that configured with fully-automated mode on the cluster where you set up Workload Management. I had to turn off Admission Control to allow deployments into the Name Spaces. The Supervisor VMs are 100% controlled by vCenter and the Workload Management process so you can see them, but can’t do anything with them. You require a Storage Policy that will determine the datastore placement of the Kubernetes control plane VMs, containers, and images. You can create storage policies associated with different storage classes. The Load Balancer that is most commonly being used and supported here is HAProxy. If you use the vCenter Server network, you must configure a load balancer to support the network connectivity to workloads from client networks and to load balance traffic between Tanzu Kubernetes clusters. Finally you need to setup a content Library and point it to the public Tanzu Content Library. This will be used to pull all the images required for the control plane, containers and images.
Deployment and Configuration:
It took a couple of tries to nail the deployment, but it must be said that VMware have nailed this Workload Management setup through vCenter. It is intuitive and once you know what goes where… easy to navigate. Through the process you are given the ability to view a network topology diagram to at least give you some indication of what is being configured.
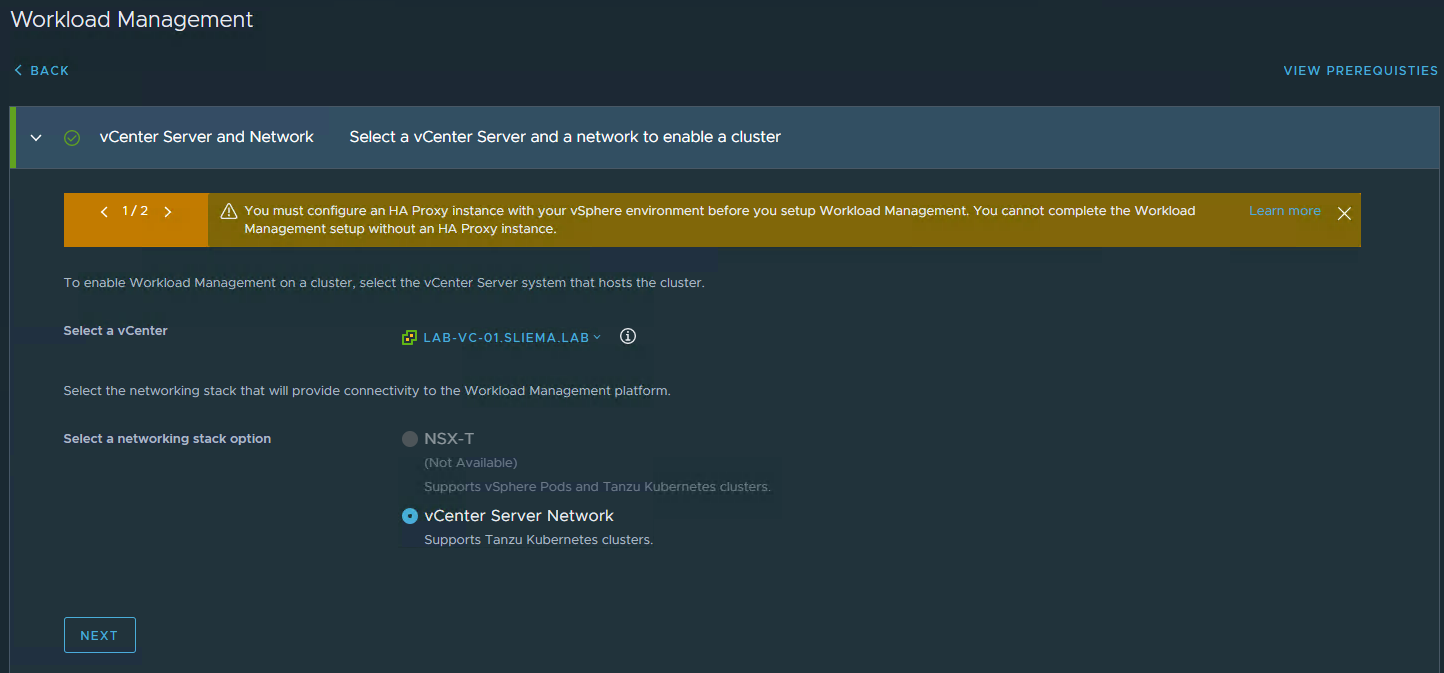
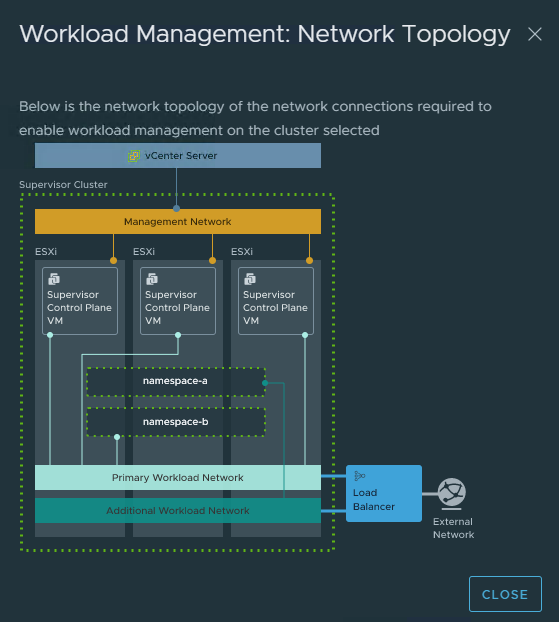 In my case, leveraging the HAProxy, I am only deploying a Management and a Primary Workload Network for the namespaces. Working through the deployment the first step is to choose which networking stack option you want. In this case, it is vCenter Server Network.
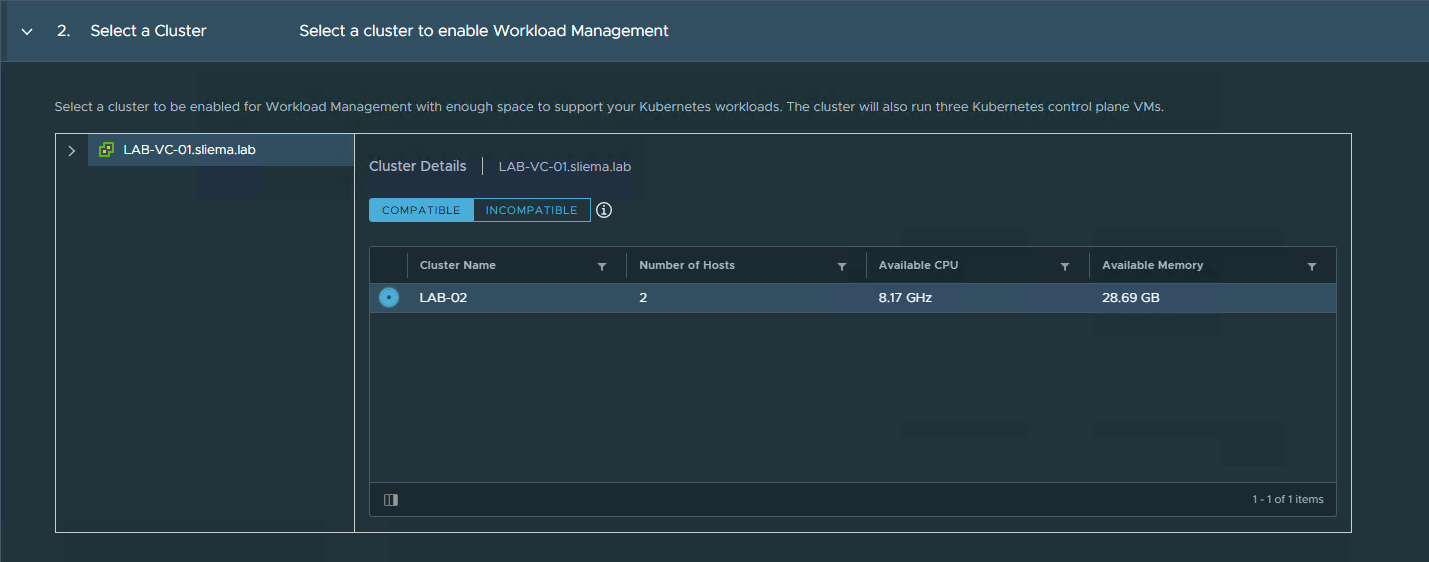
 Next, we select the Cluster to deploy the Kubernetes control plane into.
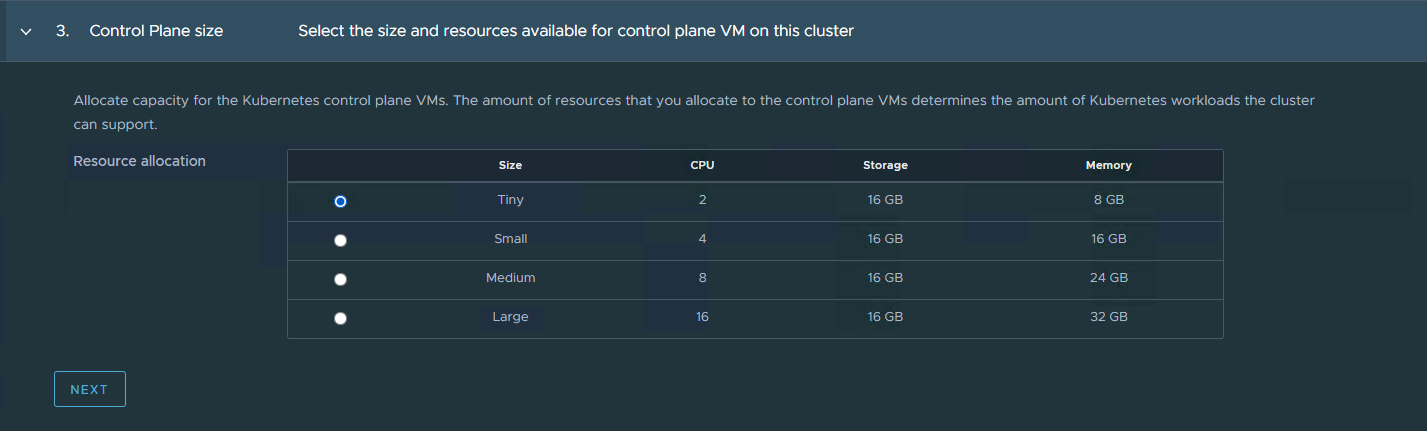
 Here, we choose the VM size of the Supervisor VMs… for my NestedESXi deployment I went with the Tiny option which will obviously limit my the scope of this deployment by way of namespaces… but as I only have 128GB of RAM to play with, that is the choice.
 Next we select the Storage Policy we created earlier.
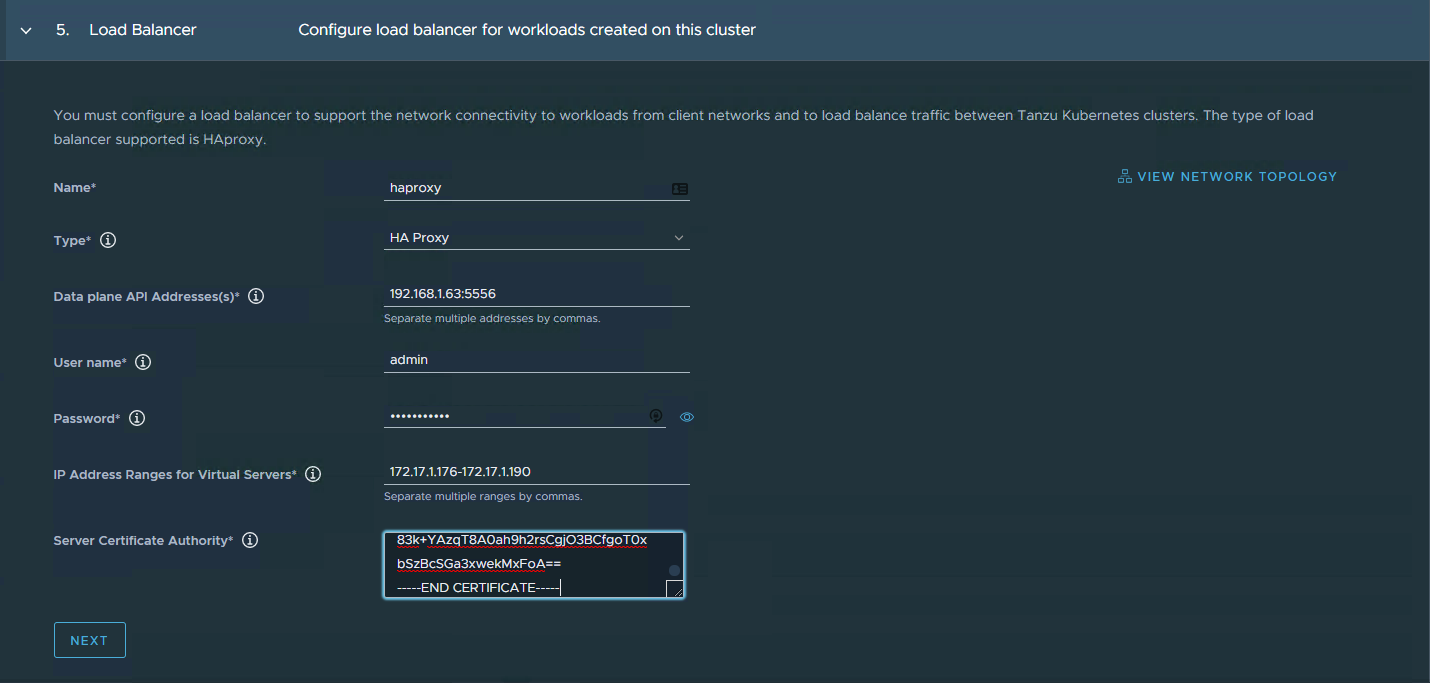
 This is where we configure and select the HA-Proxy that we previously deployed and configured. The Virtual Server IP Range is used by the Supervisor cluster to act as a communication point and we need to get the SSL Certificate from the HA-Proxy VM by way of SSH’ing in and going to /etc/haproxy/server.crt and copying it in.
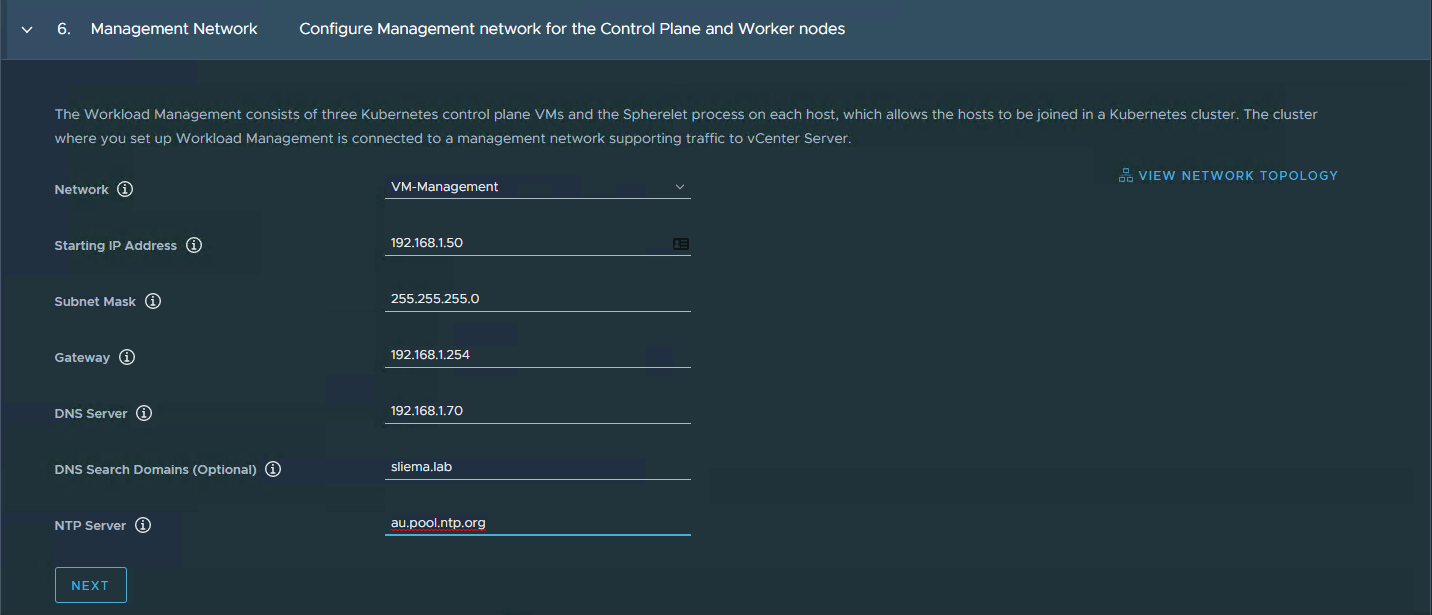
 Next we configure the Management Network, which is the IPs the Supervisor VMs will get to be able to talk to vCenter, DNS etc.
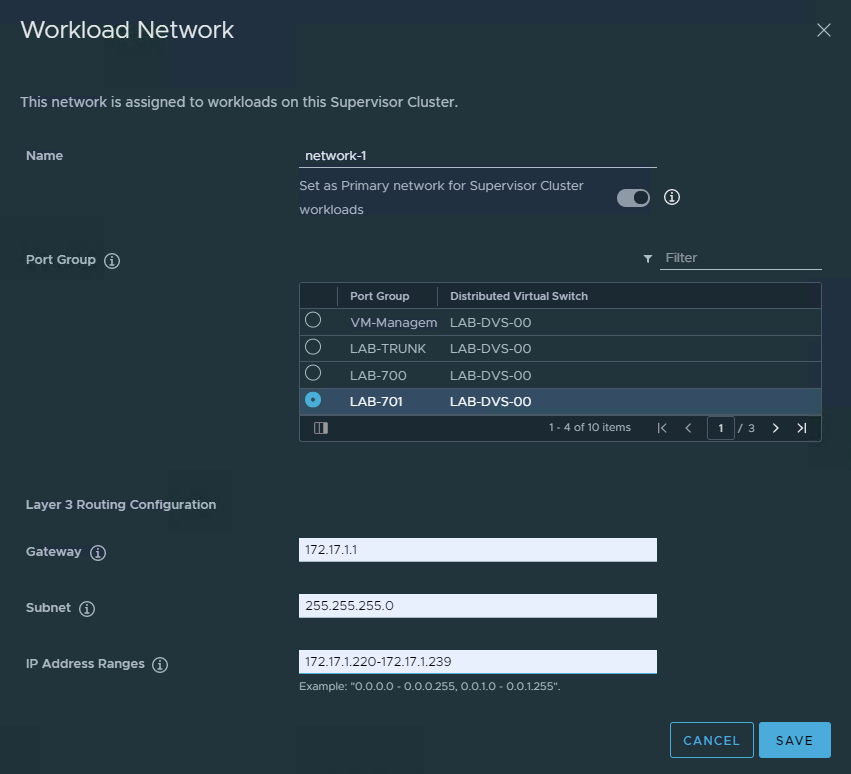
 And then it comes to the Workload Network. This one confused me a little to start with, but it will be where the workloads are deployed under the name spaces. As shown below I am using a network that is a Private VLAN handled by the Vyos with a small enough range to do basic testing with.
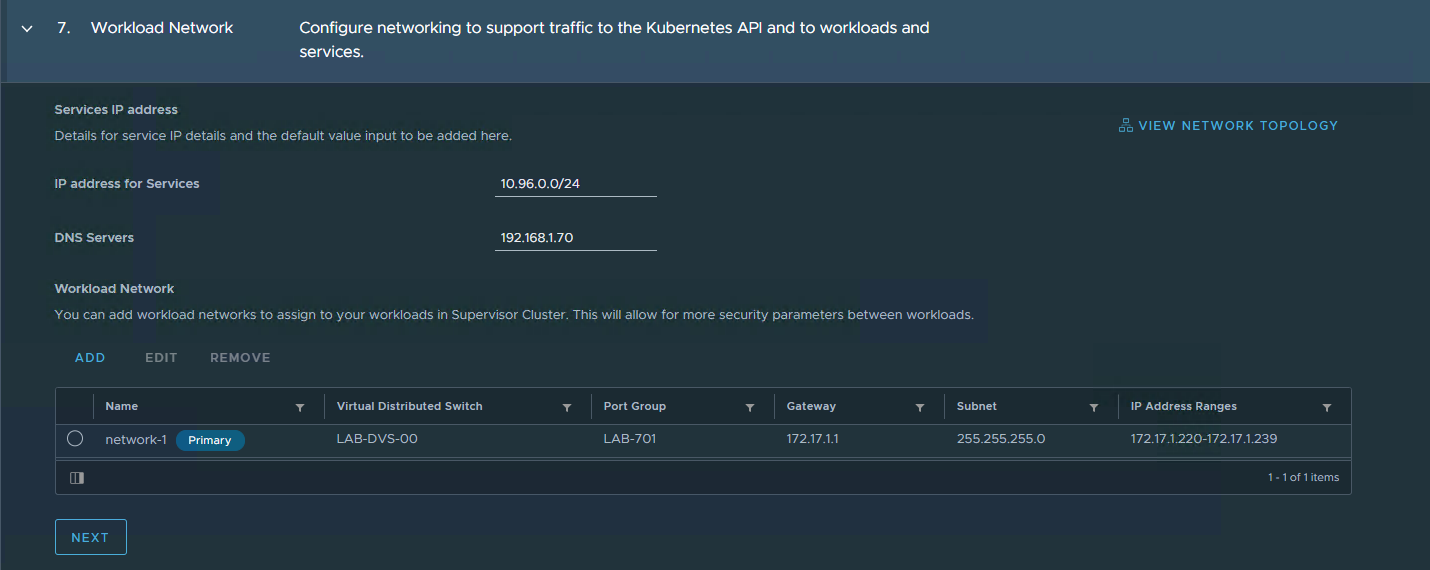
 Leave the IP Addresses for Services as the default and I did add the DNS Server again here, though wasn’t sure in what context that is used.
 With all that done, finally we add the TKG content library and hit deploy.
 The deployment of the three Supervisors took about 10-15 minutes for me and once done I was able to access the Kubernetes CLI Tools page from the first Virtual Load Balanced IPs I provided earlier in the setup.
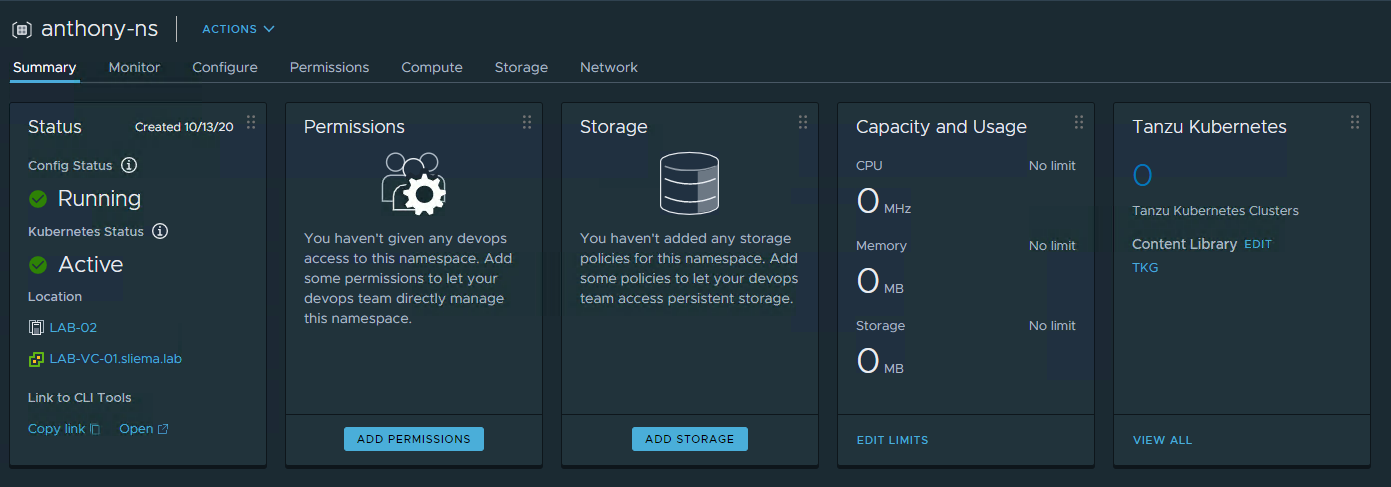
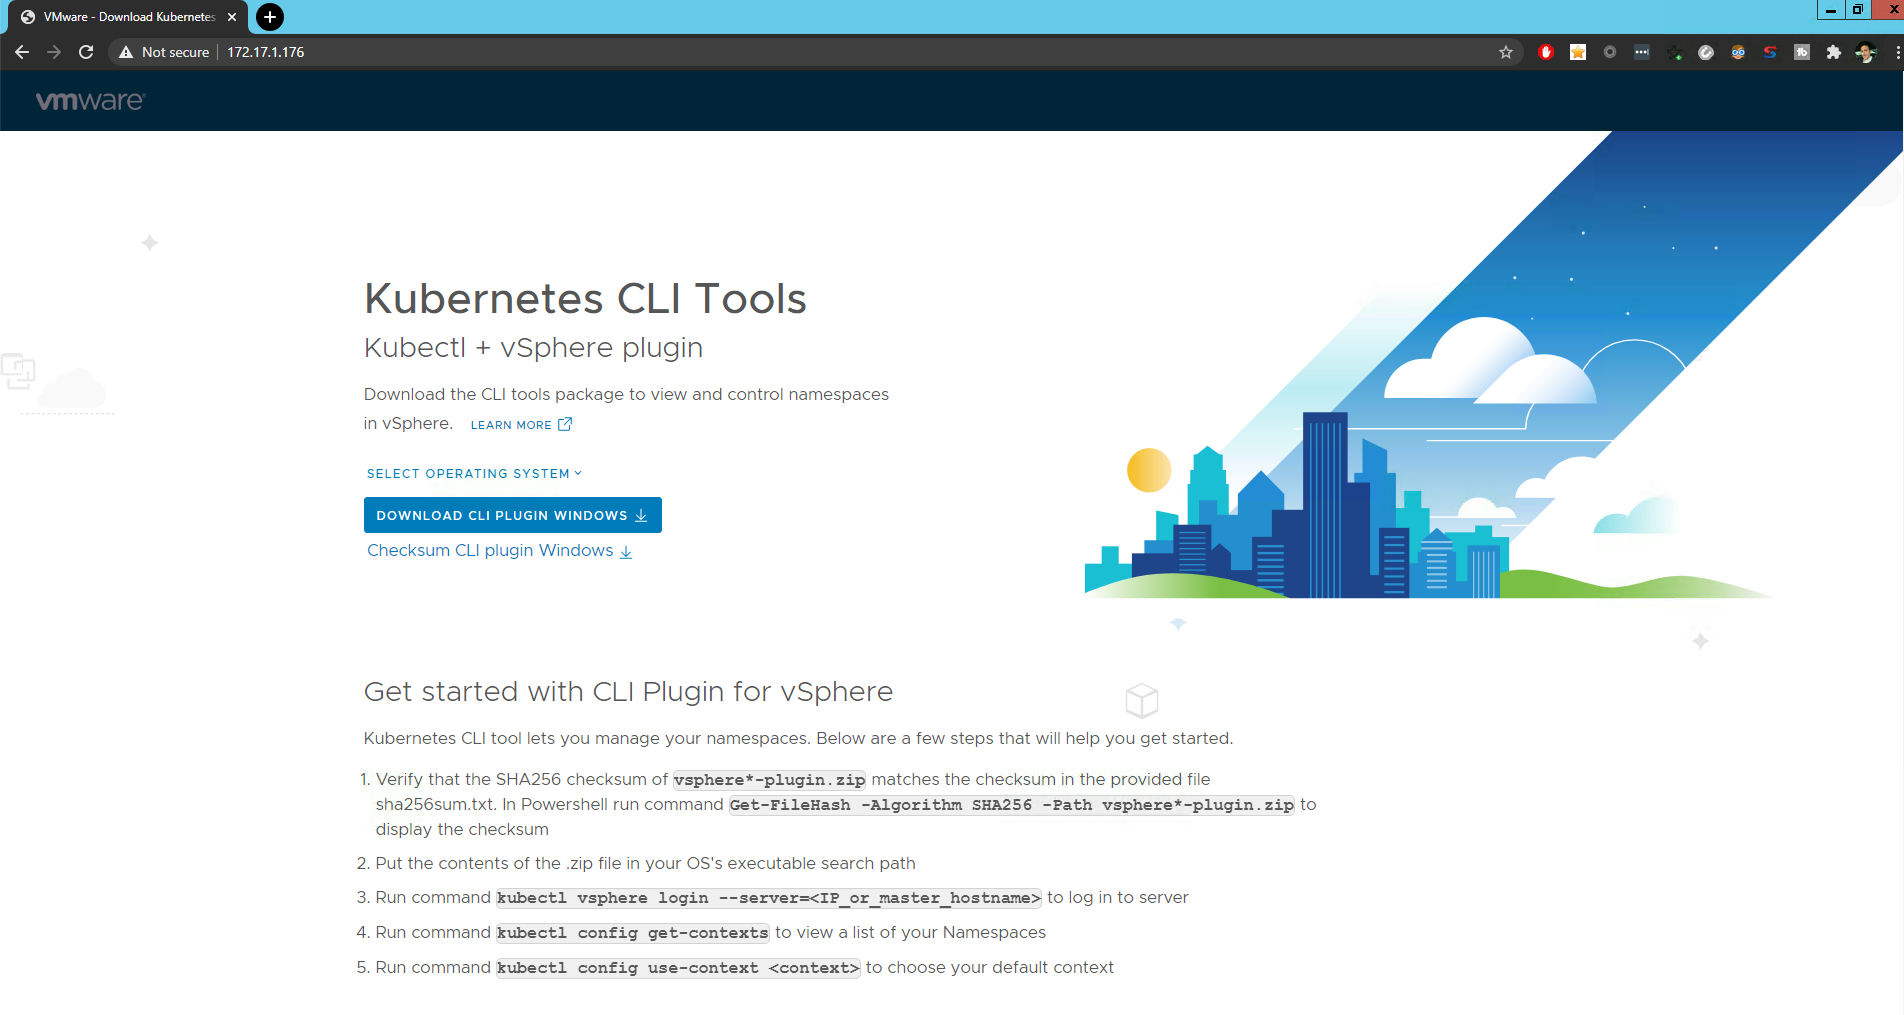 From there I was able to create my first Namespace and we are now ready to use kubectl to login (as shown above) and deploy workloads into the Namespace. Note that I left everything as default, so no security permissions have been configured, but this is where Tanzu starts to come into it’s own. The allocation of Namespace resources to different users for different purposes is the real power… the IT Admin can support the vSphere Cluster, while the DevOps can operate within a Namespace that can have resources controlled.
7 Commentsarchived